 Tip: Select "Command" + "F" on your keyboard to find a keyword/question (MAC)
Tip: Select "Control" + "F" on your keyboard to find a keyword/question (PC)
General Set Up
The questions below are commonly asked during your Samples set up process for new users. Please work directly with your Launchmetrics Customer Success Manager to ensure you are taking advantage all possible options.
How do I reset my Samples login password?
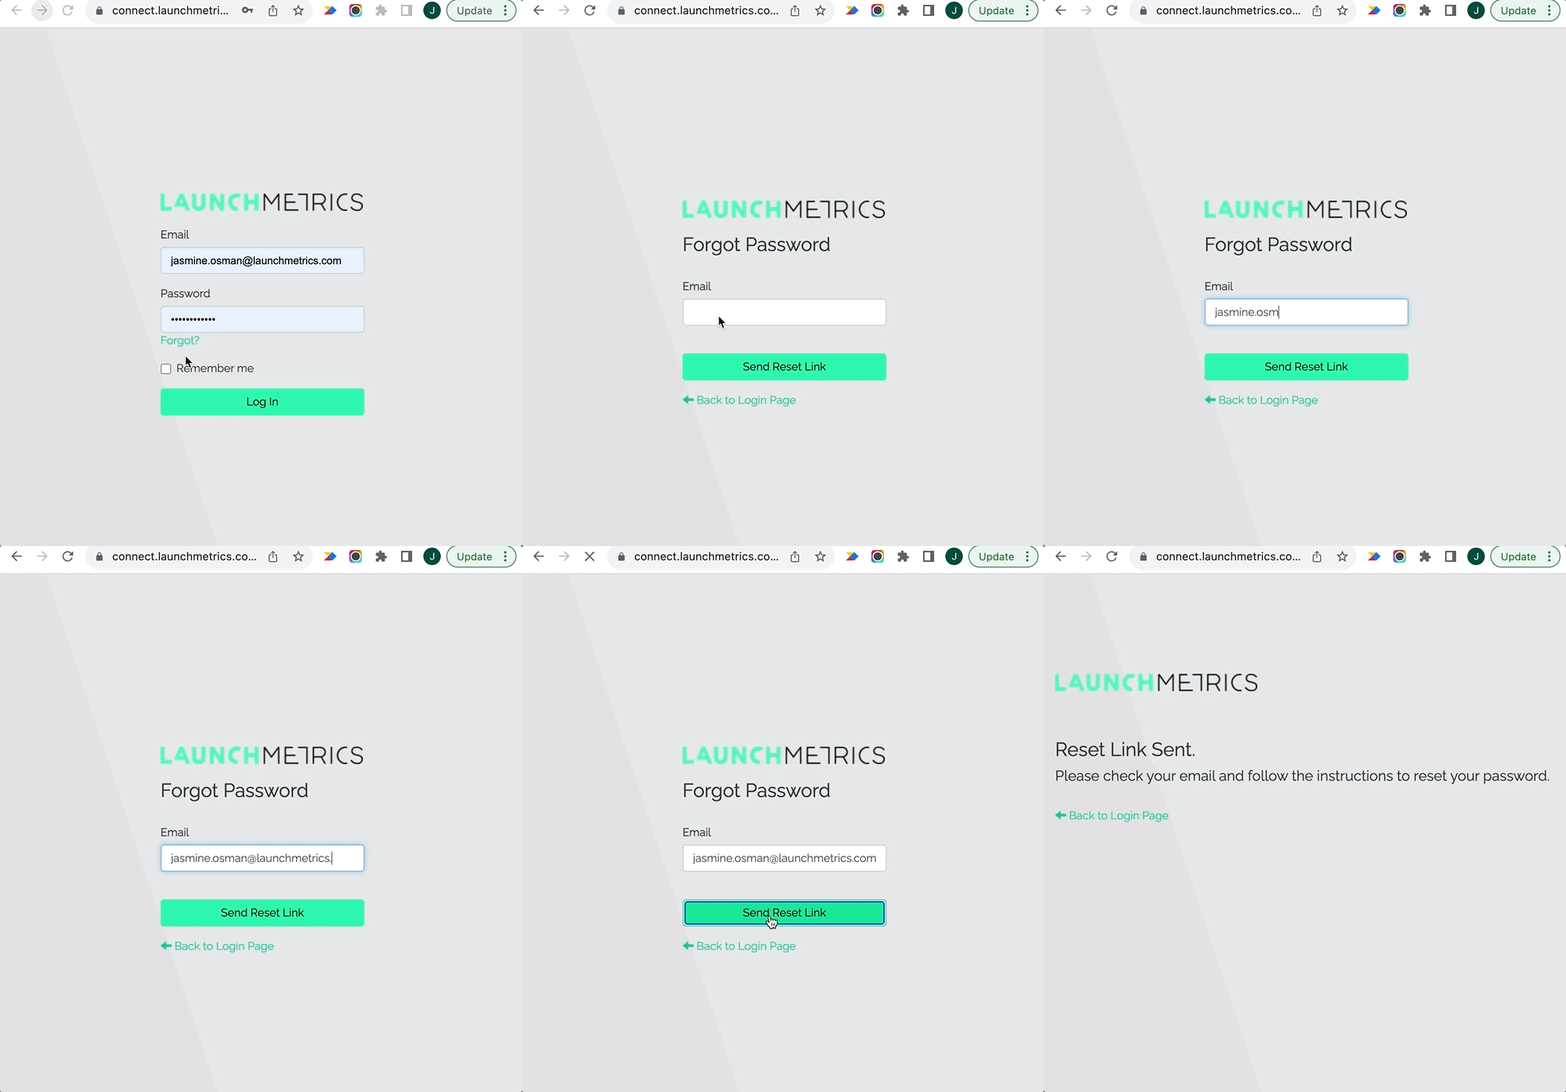
- Navigate to “https://portal.launchmetrics.com/”
- Click “Forgot” under the password field
- Type in your email address that you provided to Launchmetrics to setup your account.
- Click “Send Reset Link”
Please make sure you check your junk mail if you do not see your reset password email in your inbox.
How do I add a new user account?
If you require a new user account please reach out to your Customer Success Manager, or our Support team (Support@launchmetrics.com). There are a few things that our team will need to know before setting up an account, it will speed up the process if you have these details at hand when requesting a user.
- Do you need an additional account, or will the new user be replacing an existing user. There may be a charge for an additional user if you have reached your seat limit.
- What access does the user require? E.G Samples and Events.
- What Department(s) does the user need access to.
- The Full name and title of the new user.
What types of User Role restrictions can be managed?
- Restricting the ability to edit or delete Inventory or Master List Samples
- Restricting the ability to import new Inventory or Master List Samples - This will also remove the ability to copy Samples into your Inventory.
- Restricting the ability to create a new Inventory or Master List Sample - This will also remove the ability to copy Samples into your Inventory from Master List.
- Restricting the ability to export for update Inventory Samples or Master list Samples
- Restricting the ability to duplicate a Sample
- Restricting the ability to bulk export Samples & Send Outs
- Restricting the ability to edit or delete Global Delivery Memos
- Restricting the ability to recover a Sample
- Restricting the ability to edit or delete a Sample Type
- Restricting loan types (Reservation, write off, Gift, Purchase etc)
These are the main restrictions we can enable for users, however if you require another setting/restriction for a user please reach out to the support team and they will be able to help.
We now also have Limited Access User Roles as of April 2024! Departments can now easily share inventory visibility with each other, eliminating the need for constant back-and-forth to check where a sample is available and when. This means that your teams can effortlessly fulfil opportunities with the right samples by borrowing from other departments, ensuring that every chance is seized and every opportunity maximised.
Please click >>here << to learn more about Limited Access User Roles.
How can I add additional departments to my account?
Please reach out to the support team to enable visibility to other departments, or to add additional departments to your tenant (website).
DeleteCan I limit a user's access to a Department?
Yes! We have 3 types of Limited Access User Roles for Departments
View Inventory
Users with this role can see all samples from your inventory. They can not perform any action on your samples, but they can see all sample details, including attachments and location.
View Availability
Users with this role can see all samples from your inventory and their availability information. They can not perform any action on your samples, but, along with the sample details, they can see the dates that the sample is reserved or when it's due back from a current loan.
View Out To Details
Users with this role can see all samples from your inventory, their availability information, and the sample send out details. They can not perform any action on your samples, but, along with the sample details and availability, they can see the shipping, contact of editorial details of every send out the samples is or has been on.
You can find additional information on Collaborative Samples Management >>here <<
DeleteCan I lock Samples fields?
Yes! Locked Lists are an excellent option to maintain clean and consistent data especially if there are multiple interns and/or new users for a short term period. By using Locked Lists in fields such as 'Type', 'Colour', 'Pattern', 'Fabric', you maintain the standards of what data values are allowed into this system. For example, this will prevent an intern from importing a "PANTS" value in Type, when all other previous Sample values are "PANT". By avoiding these situations, this leads to cleaner Reporting and overall system environment.
Please reach out to your CSM or the support team if you would like to lock any fields.
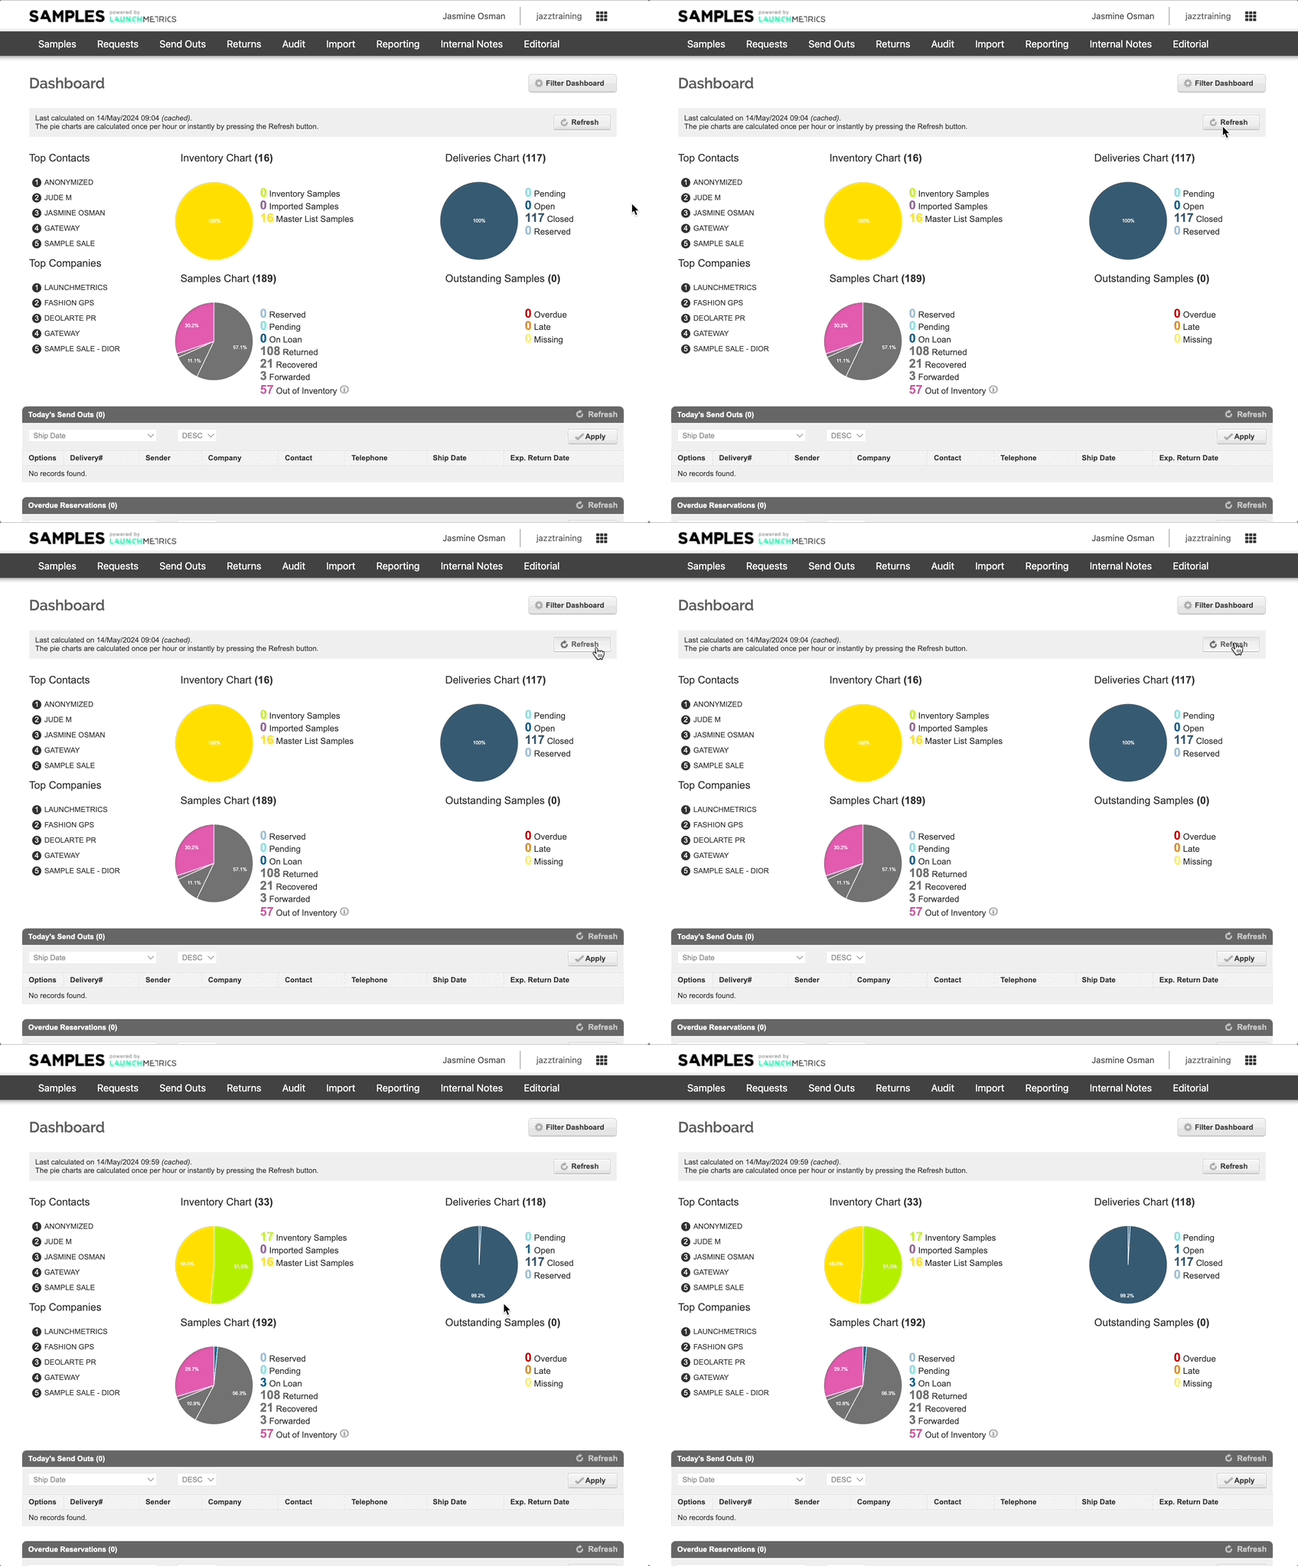
My Samples Dashboard isn't reflecting my Samples inventory
The Sample pie charts are calculated once an hour, however you can push calculations instantly by clicking the “Refresh Button”.
Is there a limit of Custom Fields I can add for Samples?
Yes, for Samples, there is a limit of 30 Custom Fields available.
DeleteManaging your Samples
I have created a Season but it's not appearing as an option when I attempt to create a Sample.
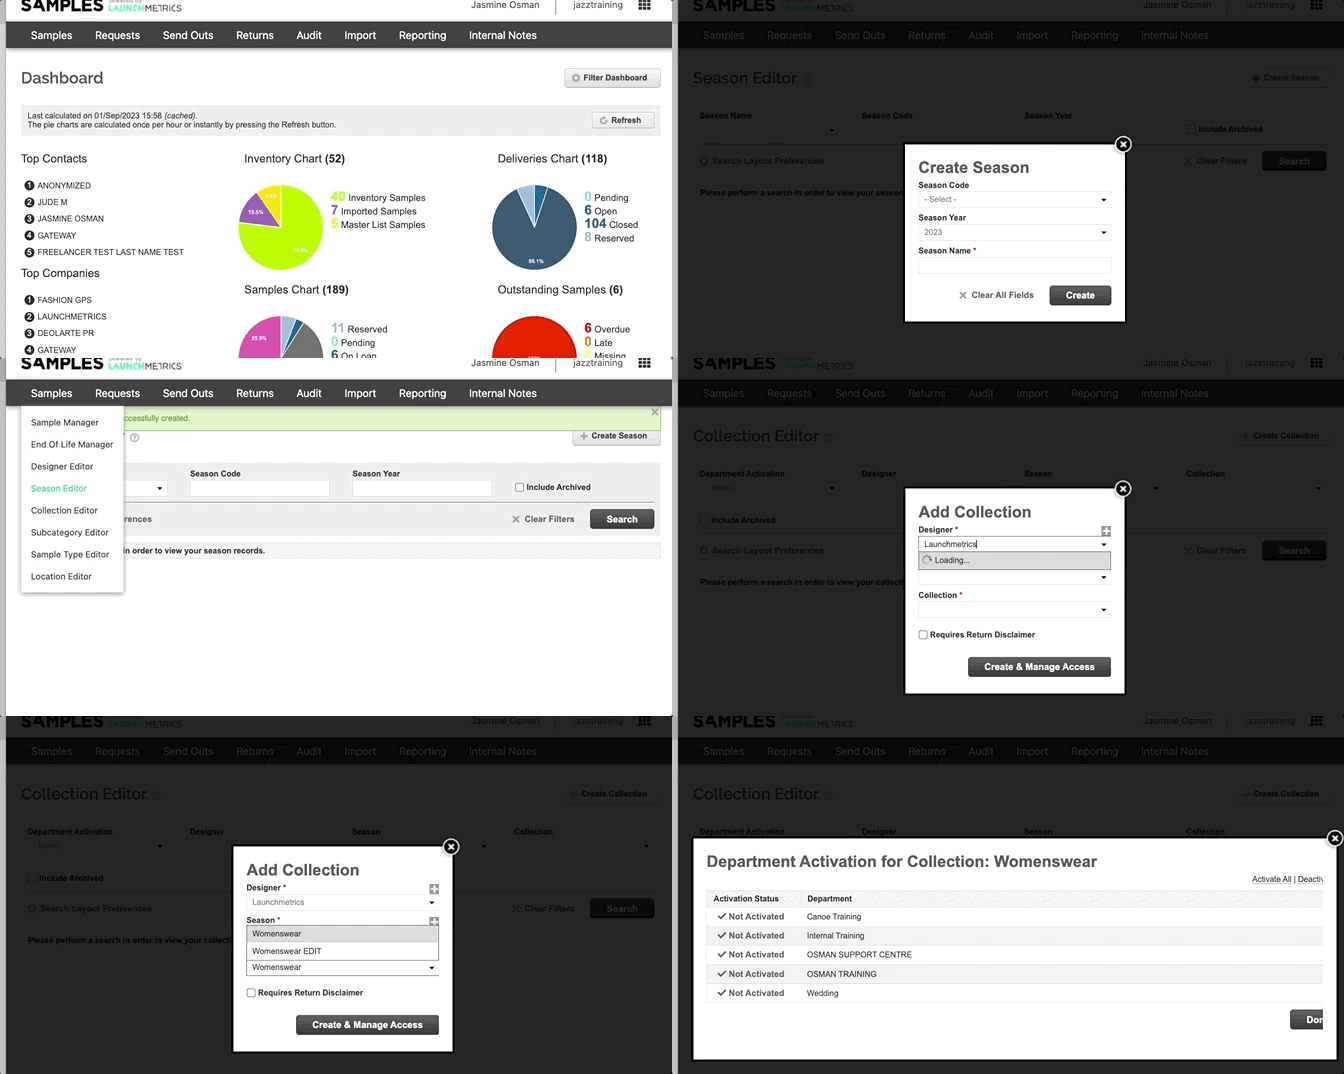
Before being able to use a Season, you need to firstly associate the Season to a Collection. Firstly you'll need to create your season.
- Navigate to your “Collection Editor” which is located in your main Samples drop down menu.
- Click “Create Collection”.
- From here you can assign your Season to your collection, and begin creating your Samples!
You can find out more about Creating and Editing Collection here.
DeleteCan I receive an email alert everyday of all Samples that are supposed to be returned to me?
Yes! In the Send-Out Manager, you will see the Email Notification Settings gear icon. This allows you to customize (per user) the type of automatic emails that you would like to receive such as Daily emails regarding Samples that are meant to be Returned that day or Outstanding Samples.
DeleteWhat is the different between “Collections” and “Collection Names”
A Collection is the association of a Designer, Season and Collection Name to one another. In order to import samples via Excel, the Collection must be created in the Collection Editor first.
For example, you have an existing Collection that is Designer: Stella McCartney, Season: AW22, and Collection name: Womenswear. Now you want to import a New Excel for Designer: Stella McCartney, Season: SS23, and Collection name: Womenswear. You still have to go into Collection Editor and associate those three fields to one another before importing your Excel.
DeleteIs it possible to delete a Designer or Collection?
Yes, but there are some rules! Firstly, If you're in the process of cleaning up your database, we always recommend archiving your Collections. The data will not be visible in your Samples Manager Drop Down Menu Search Wizard, but the information will still be preserved and you can unarchive the Collection at any point for reports, or anything else you may need it for.
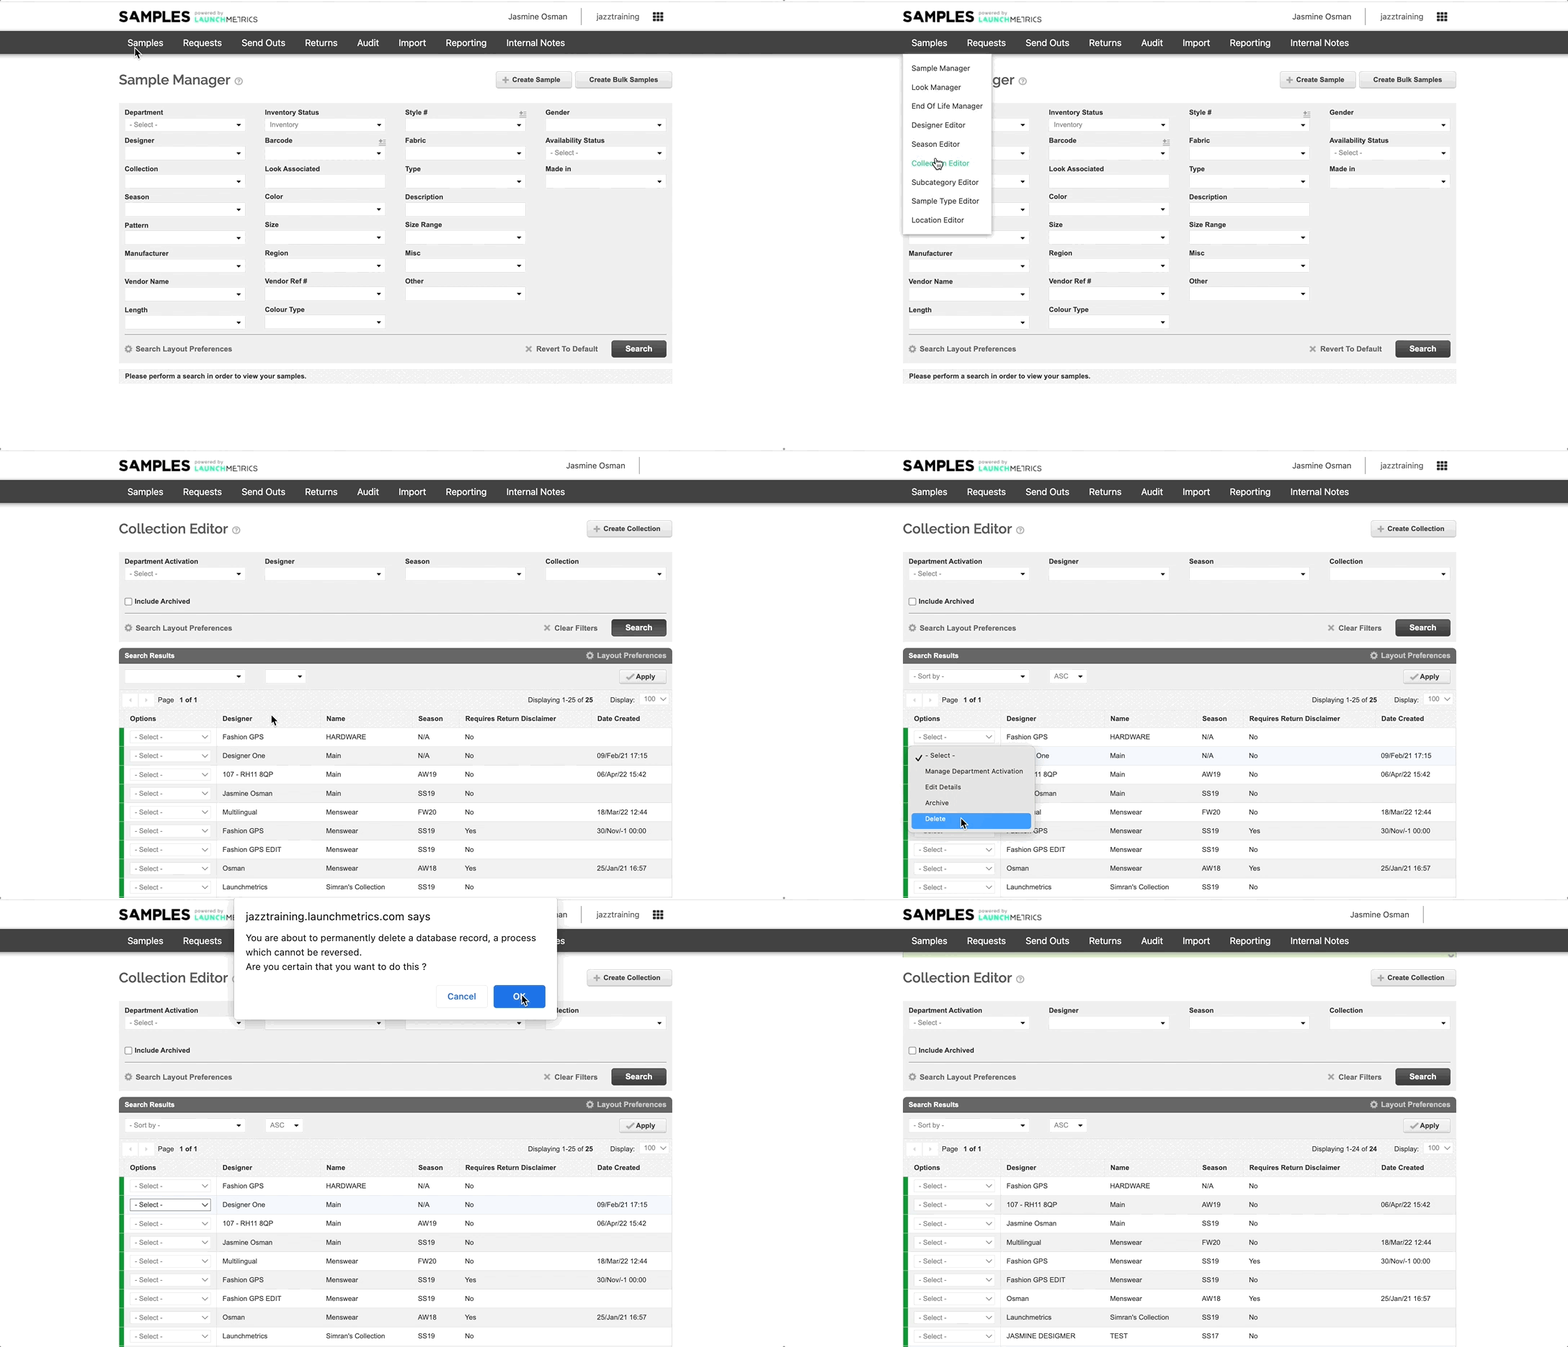
If you would still like delete a Collection, you can do so by following the below:
- Search for the collection you want to delete using in Collection Editor which is located in your main Samples drop down menu, and click Search.
-
Once you've found the collection, click the "Options drop-down menu" and select "Delete".
If you'd like to learn more about Samples Clean Up's, we hosted a recorded client workshop that you can watch here .
Delete
What file types are supported for Samples importing/uploads?
Below you will find a list of Supported File Types that Launchmetrics accepts when uploading Sample Images.
- GIF
- JPG
- JPEG
- PNG
- SWF
- PSD
- BMP
- TIF
- TIFF
- JPC
- JP2
- JPX
- JB2
- SWC
- IFF
- WBMP
- XBM
- WEBP
- HEIC
Are there specific dimensions needed when uploading a clients Department logo?
The size of the logo used in delivery documents is always 198 pixels width and 33 pixels height, and is a third of the original image, which is 600 / 100, and it cannot be changed, at least not now.
If a client sends a logo with a lot of unused white space on both width and height, this can make the logo appear smaller. In this instance we suggest asking the client to adjust/crop the logo to remove any unused/white space.
Feel free to create a product request if you feel this is something we need.
Is it possible to search for multiple Barcodes at once?
Yes! Within Samples Manager, End of Life Manager and Send Out reports you can search for multiple barcodes at once by clicking the plus sign icon with multiple lines (as shown below).

Managing your Send Outs
Can I change my send out from a loan to a transfer if I have made a mistake and the Samples are already on loan?
Yes you can! This action can only be done prior to the Samples being received into a new department.
Firstly you'll need to navigate to your Send out manager and locate your delivery.
- Click on the “Layout Preferences gear icon” above the list of samples currently on the delivery.
- Double click or drag the Layout Preference field “Transfer Samples” to the selected headers and click submit.
-
Use the check box to select which samples need to be edited to either a Transfer or Loan.
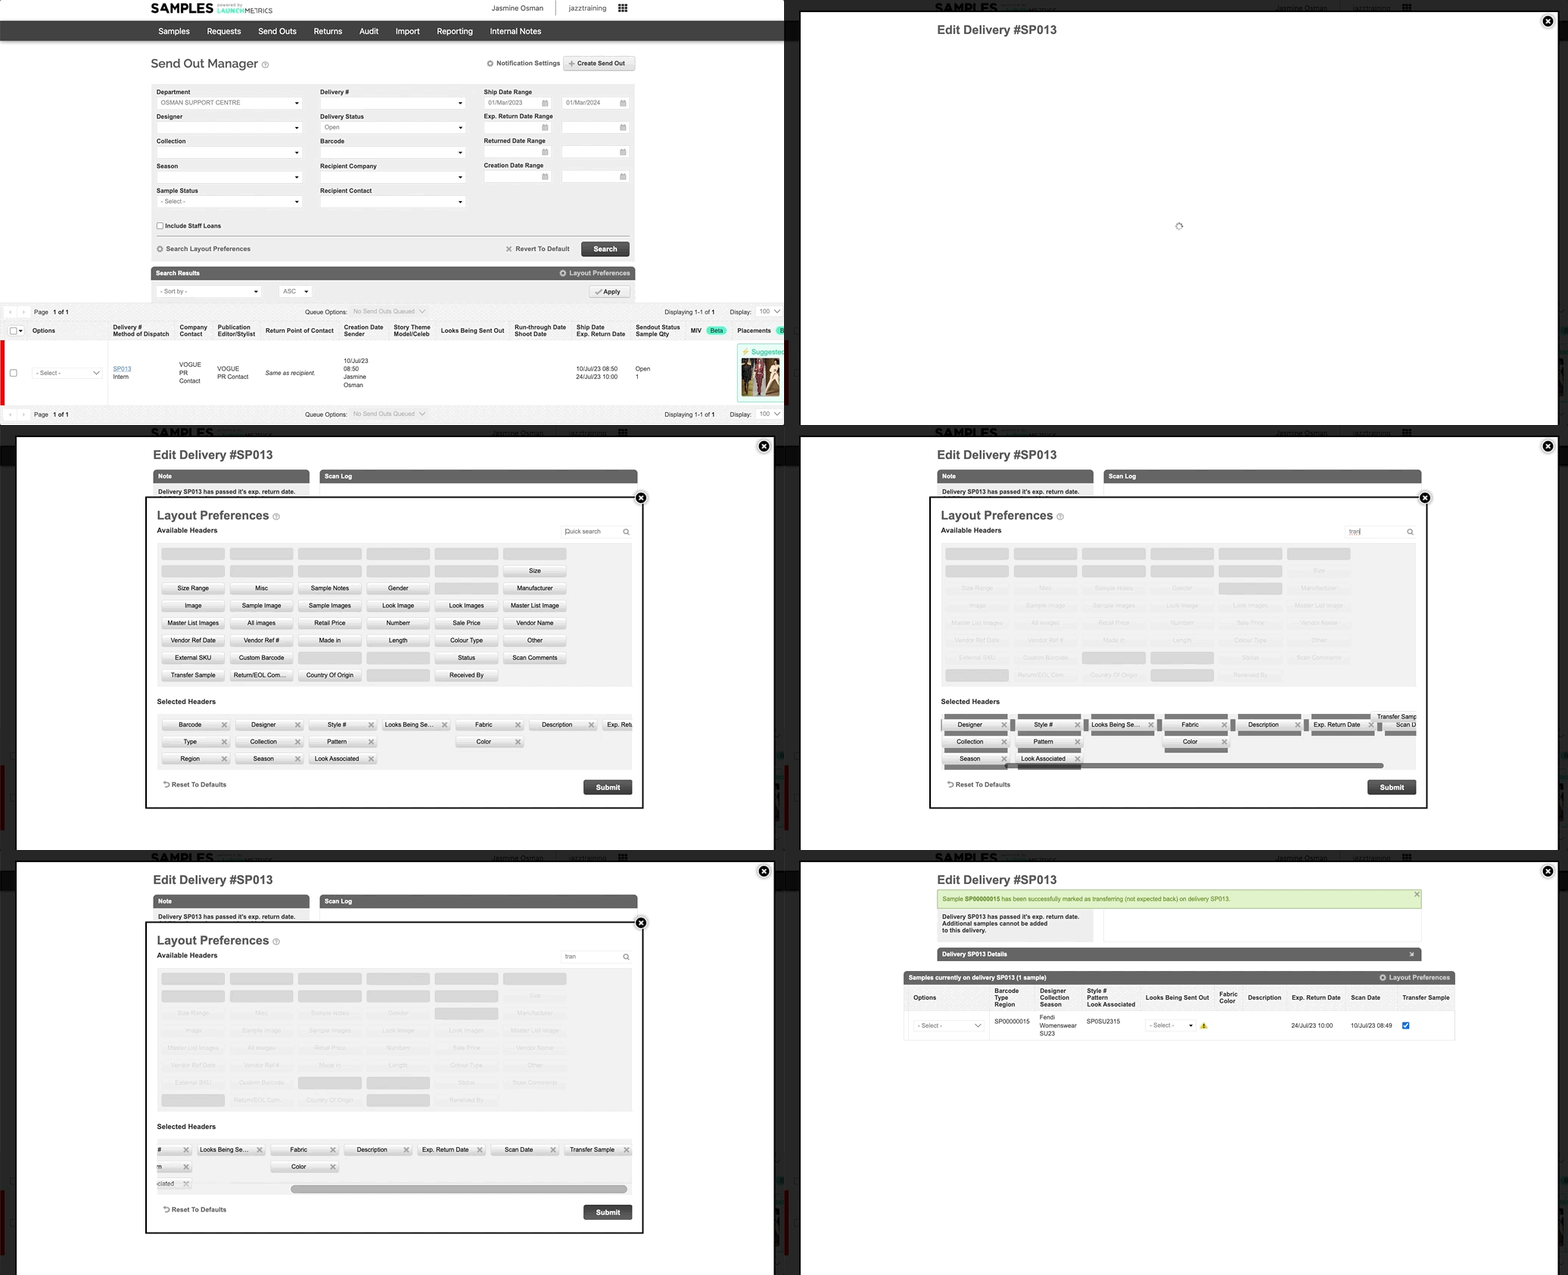
You can find out more about editing Send Outs here.
DeleteI am trying to return a Sample but Launchmetrics says it's not out on loan. What do I do?
If you're trying to return a Sample but Launchmetrics is telling you it's not out on loan, this either means it was never sent out or it's already been returned. You can find when a Sample was last returned into your inventory by navigating to your Samples Manager.
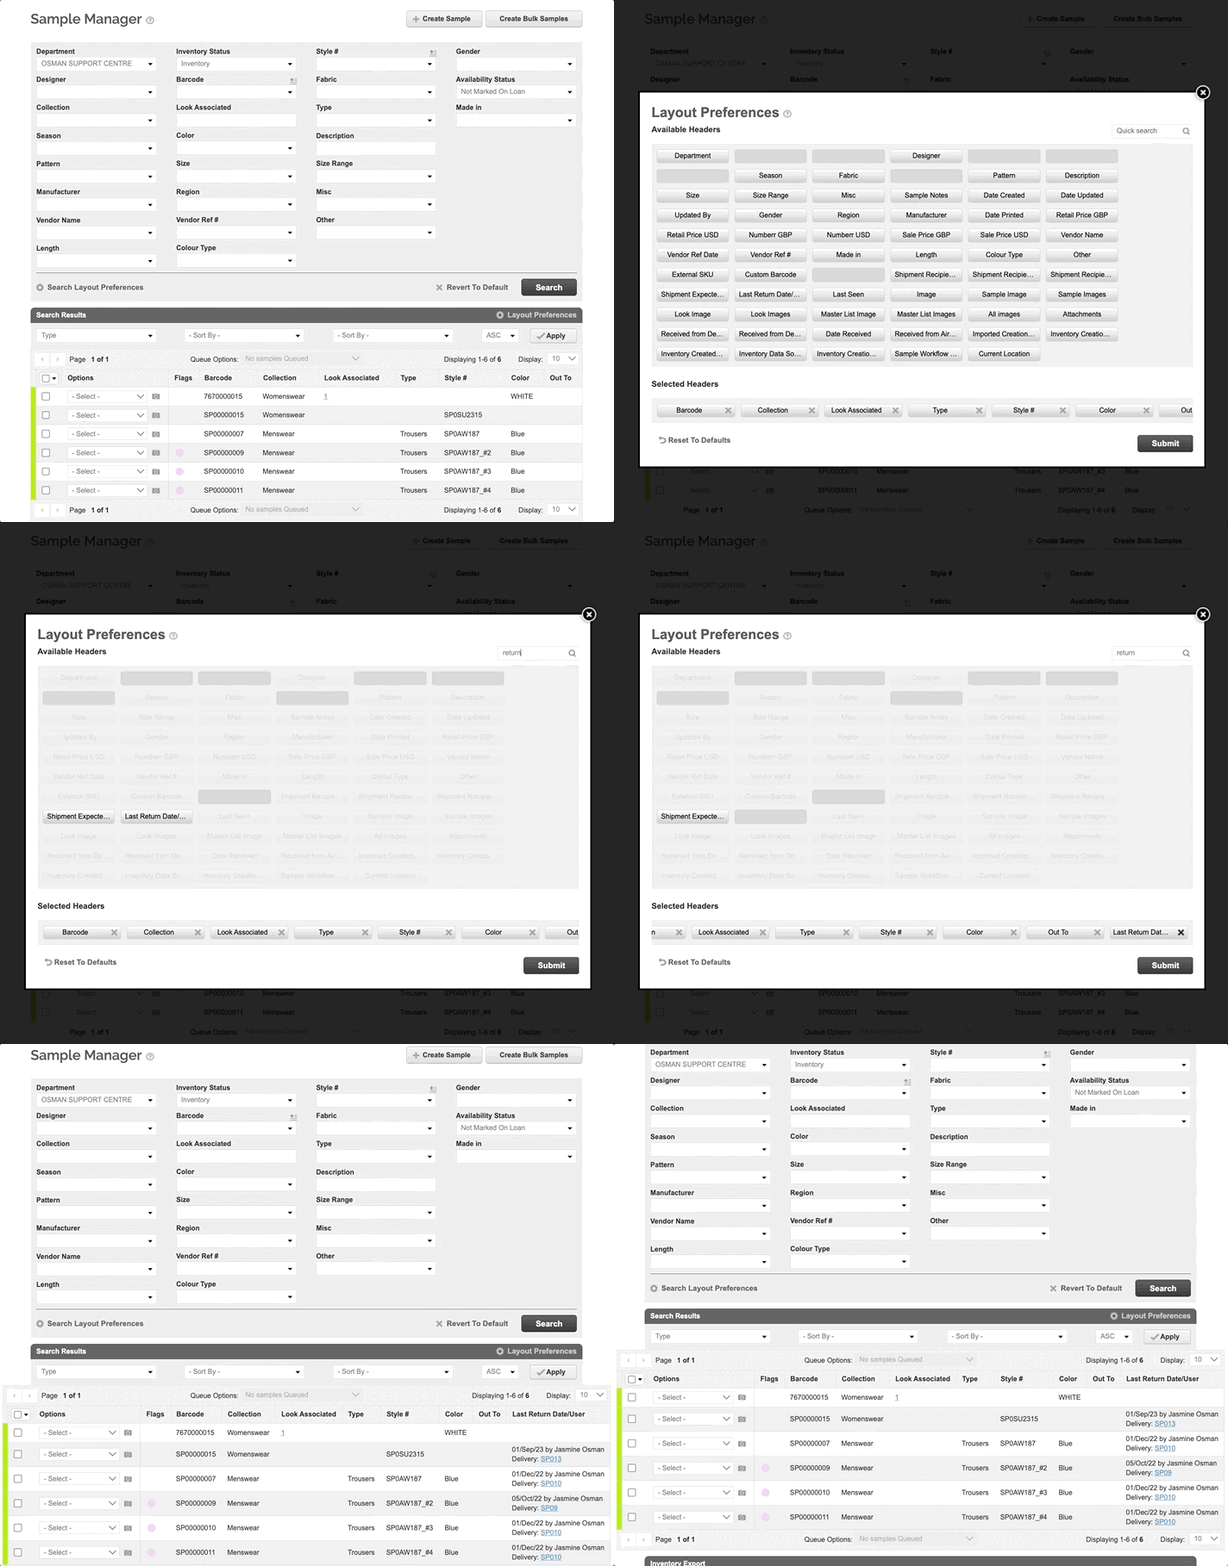
- Search for your Sample in Samples Manager.
- Click on the “Layout Preferences gear icon” above the list of samples.
- Double click or drag the Layout Preferences field “Last Return Date/User” to the selected headers and click submit
-
You'll now see the return information for the Sample with the delivery information.
Delete
Can I email Recipients of our Send-Outs to let them know that they owe us back Samples?
Yes! You have a few options:
-
For Deliveries which are labeled as "Outstanding" (Overdue, Late, or Missing) you can Raise Reminders. This is done by going to the Returns > Overdue Returns section, finding the Delivery which contains the samples that you need back, and using the Options dropdown to select 'Raise Reminders'. This will allow users to make "Reminder Comments" on each Samples, and then 'Email' the Recipient directly through the platform.
-
You can also Email "Delivery Memo's" directly through the platform, which is a good method for Deliveries which are not yet Outstanding.
- If you want to export a list of ALL samples that are with a specific recipient or company, you can go to “Send-Out Report”, filter by recipient or company and then either email it directly from the system or export to excel and email it to them.
What's the difference between a send-out and a loan?
We use the term send-out and delivery interchangeably. In the system, a send-out is what you create when you are preparing samples to go out right now (you also have the ability to create a request/reservation which is essentially a future send-out). You can select different types send-outs:
Transfer
Samples you are sending out and don't expect back (Typically used when you are transferring samples permanently from one department to another Ex. Samples arrive in HQ in Paris, then Paris needs to give the US their samples, they will create a transfer which will move the samples from their inventory to the US' inventory. It's important to note that sample ownership dictates who can control samples- mark end of life/recover them.)
DeleteReservation
Samples you will send out in the future that you want to reserve or block. Once samples are reserved- no other user can create a send-out that conflicts with that date.
DeleteReturn to Vendor
An "End of Life" send-out. If samples are marked Return to Vendor they are removed from the inventory and if you want to bring them back, they need to recovered via the End of Life Manager. Return to vendor is usually used for samples that are being sent back to a manufacturer or vendor.
DeleteSend to Archive
An "End of Life" send-out. If samples are marked Send to Archive, they are removed from the inventory and if you want to bring them back, they need to recovered via the End of Life Manager. Send to Archive is usually used for samples that are being sent back to an archive warehouse (where the warehouse does not use Samples. Some brands have an "archive" department and transfer samples to this department).
DeleteWrite Off
An "End of Life" send-out. If samples are marked Written-Off, they are removed from the inventory and if you want to bring them back, they need to recovered via the End of Life Manager. Written-off is used for lost samples or samples that are damaged beyond repair. This is important to report for a brand's budget/finance team.
DeleteGift
An "End of Life" send-out. If samples are marked as Gift, they are removed from the inventory and if you want to bring them back, they need to recovered via the End of Life Manager. Gift tracks samples that are gifted and if a brand does do gifting, it's a helpful report.
DeleteHow do I see where my overdue, late & missing samples are?
There are two ways you can search for your overdue Samples.
-
“Overdue Returns”. You can use this feature by navigating to your Returns tab and selecting “Overdue returns”. Click here to view our step by step manual!
- "Send-Out Reports". You can use this feature by navigating to your Reports tab and selecting “Send-Out Reports". Click here to view our step by step manual!
Within both of the reports above you will be able to view recipient and company details assigned to the Send-Outs and Samples.
Delete
Reporting
Can I run a Report to see which Samples I have sent out the most?
Yes! Within the Reports, we have a report called “Efficiency Performance Report”. In this report you can use the filters provided to search for the data you're looking for such as Designer, Collection, Season, Date range & more!
DeleteCan I run a report to see which Samples have never been sent out?
Yes! Within the Reports, we have a report called “Efficiency Performance Report”. In this report you can use the filters provided to search for the data you're looking for such as Designer, Collection, Season, Date range & more!
DeleteEach season our finance team asks us to send them a report of all the samples that we have. Can we do this?
Yes, there are two ways to see what you currently have in your Inventory.
-
Within your Samples Manager you have a tab named “Availability Status”. You have two options “Marked on loan” and “Not Marked On loan”, you can juggle between the two to view your inventory.
- The Audits tab. The Audit feature is a perfect place to run inventory audits. Multiple users can scan barcodes at the same time, to speed up the Audit process. When all physical items have been scanned within the Audit feature, the final report will show you all items that are FOUND (if Scanned or on Send-Out), MISSING (if not scanned during audit and not on current Send-Out), OVERAGE (items that have been scanned physically but shown as Out On Loan. These items should be marked as Returned). Audit's can also be handled via Samples Mobile.
Can I run reports on specific Send-Outs and fields such as Type or Recipient?
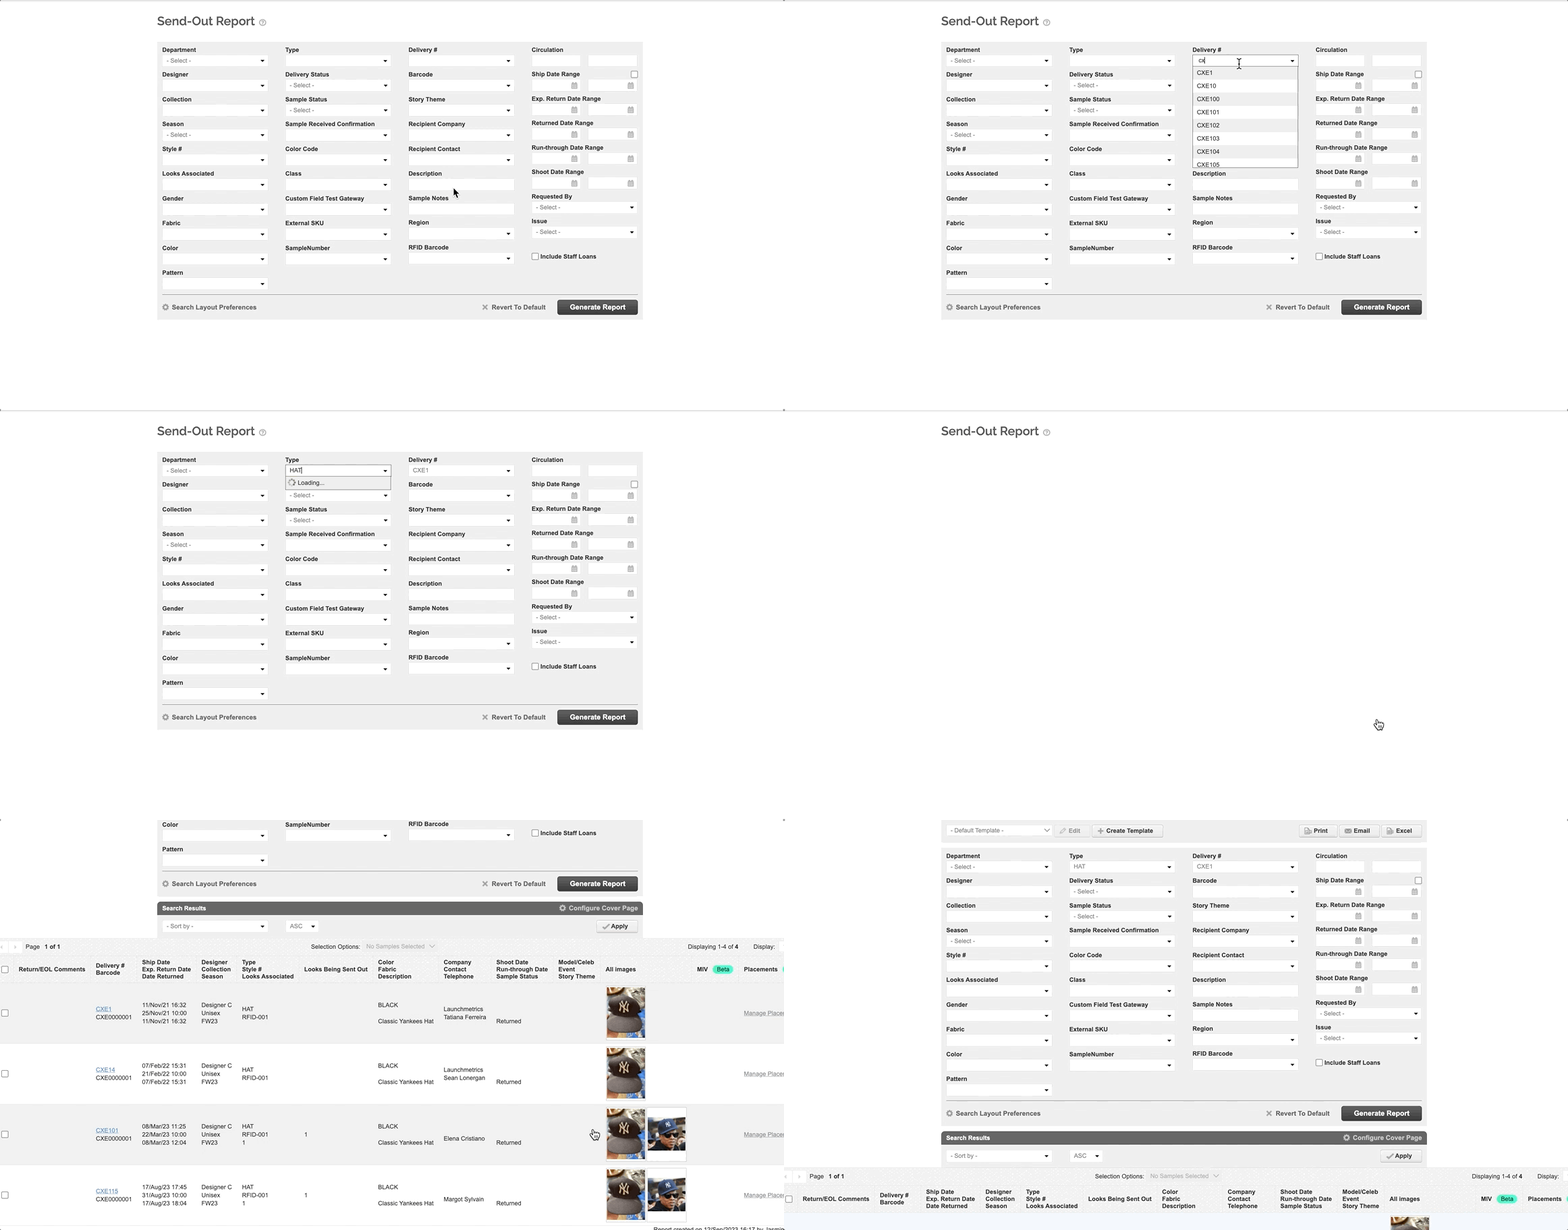
Yes! The best way to run reports on Send Outs is using “Send-Out Reports” which can be found under the “Reporting” tab. Within Send-Out Reports we have a large list of fields to chose from to filter down your search. You can also customise your own template to export only the relevant information you need! For example you can run a report on “Delivery XYZ” to only show the type"HAT" and only export the barcodes, or simply perform a search filling out just the recipient name field to find all send-outs sent to the specific recipient.
Hardware & Labels
How can I make sure my barcode labels stick to our clothes and do not fall off?
Providing you have purchased the labels recommended by Launchmetrics, the labels adhere securely to clothing and should not fall off.
Here are a few suggestions:
- Surface Preparation: Make sure the area on the clothing where the label will be attached is clean and free of any oils or dust. This helps the adhesive bond more effectively to the fabric.
- Press Firmly: After placing the label, press it firmly with your hand for about 10-20 seconds. This pressure helps activate the adhesive and create a stronger bond.
- Avoid Stretchy Areas: Try to attach the label to a part of the clothing that isn’t stretched often, such as a tag or a flat section. Stretching can cause the adhesive to weaken.
- Test First: If possible, test the label on a similar fabric or hidden area to see how well it sticks and to ensure it doesn’t leave any residue or damage.
Another suggestion if you're really worried about certain garments it so use multiple labels. For example one under the collar, and one on the care label.
DeleteMy Samples already include a barcode when we receive it from our factory. Do we need to apply a Launchmetrics barcode as well?
Launchmetrics provides 3 unique Custom Scannable Barcode options that can easily be activated by your Customer Success Manager. This feature allows you to use your own pre-barcoded numbers as reference in Launchmetrics for your samples. The barcode number needs to be a 'Code 128 linear barcode' for it to successfully scan in Launchmetrics.
DeleteCan I use my own printer such as a DYMO or HP Printer to print out Launchmetrics barcode labels?
Launchmetrics is only able to print barcode labels using a Zebra Technologies printer. Please speak with your Customer Success Manager or our Support team if you are purchasing printers outside of our recommended list.
DeleteCan I change the layout of my labels (Customising labels)
Swapping out the fields/data you see on the standard label can be easily done as part of your implementation, or after! We can also set up a template for smaller labels for jewellery/eyewear. Please reach our to your Customer Success Manager or the Support team for more information on this.
DeleteWhy do we recommend having a label printer AND a barcode printer
In theory, both zebra printers we recommend for Address Labels and Barcodes Labels could be used to print both address labels and barcode labels.
We however recommend using separate printers for practical reasons.
Addresses labels are usually printed on bigger labels as there is more information to print. While barcode labels could be pretty small.
We recommend buying 2 models so you don't have to change labels between printings, which can be a bit complicated to do and may require printer setup and media calibration, slowing down the printing process.
DeleteWhere can I find the shiny labels for Barcode Printing?
When printing labels, you have two options: use ink or do not use ink.
It depends on the label you want to use: Thermal transfer or direct thermal.
Labels that look like paper are direct thermal labels and do not require ink. The newer printers tend to not require ink. Labels that are "glossy", i.e. laminated, are thermal transfer labels and require ink. These labels are typically used for the older models such as TLP2824.
Therefore, if you do want to print with a thermal transfer printer, you would need to make sure that your printer is compatible with thermal transfer labels and purchase the necessary ink and ribbon (you can find more information about this in this link ). Please note Launchmetrics do not have any thermal transfer printers, not have we tested them (apart from the old model TLP2824). Should you choose to acquire a printer that is not included in our recommended list, please be aware that this decision is made at your own risk. While we will certainly make every effort to assist you with any troubleshooting and setup, we cannot assure successful resolution, as we have not conducted tests on those specific models.
Zebra printers can support both types of labels, or only one of them, but the part number of the printer you are using should let you know if it is compatible. You can also check it in your printer's user guide.
We recommend using direct thermal printers, which do not require ink, because they are less expensive to use (no ink cartridges) and easier to maintain over time.
The materials for these labels feature a protective topcoat. The adhesive carries excellent low temperature resistance and heat, although extreme heat is not advised.
Recommended for applications such as sample labelling, shelf edge labelling, product and price labelling in retail applications, chiller and freezer applications, product identification, sample labelling in healthcare, shipping, picking and receiving labels in warehousing applications, box and pallet labelling.
If you have further questions please feel free to reach out to our support team (Support@launchmetrics.com).
How do I know if my Scanner is compatible with Launchmetrics?
To be compatible, we have 3 criterias:
- Type of readable barcode: The device should read 1D and 2D barcodes, in the format code 128
- Connectivity: The device needs to be able to connect to computer (USB, bluetooth) and mobile (bluetooth)
- Scanning format: Allow to generate an "enter" action after scanning a barcode
Typically, we suggest using Zebra scanners due to their reliability, as we possess these devices and can utilize them for troubleshooting scanning problems. If you are using another device, outside of our recommended list we will not be able to provide adequate support.
Please reach out to the support team if you have any questions on your scanner model.
DeleteHow do I check if my printer and labels are compatible?
To check if labels are compatible with your printer, you need to confirm:
- Print type → Direct Thermal vs. Thermal Transfer
- Label size vs. printer’s max width
- Core size (e.g. 1") and roll diameter (e.g. max 5")
- Label format → gap, black mark, or continuous
- Material suited to your use case (adhesive, surface, etc.)